Table of Contents
-
Definitions
-
Navigate the Main App Calendar
-
Manage Your Calendars
-
Understand the Calendar's Display of Bookings
-
View, Edit, and Delete Bookings
-
Calendar Terminology
Definitions
Before working with your Main App Calendar, it’s important to understand the following terms:
Calendars
"Calendars" are an internal sorting tool used by staff to organize events and schedules within the Main App's Calendar display.
Events vs. Bookings
-
An Event is the foundation or template of a recurring scheduled activity.
-
A Booking is an individual occurrence of that event where participant activity and attendance data are collected.
Example:
You create a recurring Bouldering Class Event.
- Booking 1: 11:00 AM
- Booking 2: 1:00 PM
Both bookings belong to the same event.
Navigate the Main App Calendar
To navigate through the dates of your calendar, you can use:
- the date picker on the left side of the screen
- filter by Day, Week or Month at the top, using the right and left arrows to look at the days/weeks/months before or after the timeframe you are currently viewing
- click "Today" to see today's calendar
-png.png?width=670&height=389&name=Wide%2c%20Template%20(48)-png.png)
Manage Your Calendars
-png.png?width=400&height=616&name=Square%2c%20Template%20(28)-png.png)
- To add a new calendar while on the Main App Calendar, click on the little plus (+) button under the mini-calendar. After clicking this button, you will then be prompted to add a Name, Description, Valid Location, and color to your new calendar. When finished, click save. After saving, your new calendar will be added to your list of visible calendars.
- The other way to create a calendar is by navigating to:
-
- The "Calendar Admin" tab
- Select "Calendars"
- Click "Add Calendar"
- Enter the following:
- Calendar Name
- Description
- Select a color
- Click "Save"
- Then, you can navigate back to the Calendar "Add Calendar(s) to My List". This will add them to your personal calendar list and make them visible on the calendar.
-
- To toggle the view to on/off for a calendar on your personal list, simply click the checkmark box.
- If you wish to remove a calendar entirely from your list, click the “X. This will not delete the calendar, but simply remove the calendar from your staff profile's view.
- If you wish to change the color of the calendar, click the hamburger menu (three dots) and select your new color.
Understand the Calendar's Display of Bookings
It’s important to notice the three different ways bookings will display on your calendar:
-png.png?width=670&height=139&name=Wide%2c%20Template%20(47)-png.png)
-
- If the booking has a white background, no one is currently enrolled in to this booking.
- It means that the booking has no participants, ticket holders, or reservations but it has generated and is available to book.
- If the booking has a solid background, customers are enrolled in this booking.
- If the booking has a white background, no one is currently enrolled in to this booking.
-
-
-
- 1) You have just created the event and the bookings generator has not run yet.
The booking generator is based on the event’s "Number of days in advance booking can be registered for" field. Generally after 10+ minutes, you can expect the remaining bookings to begin generating if they are within the days in advance to book window. If you have a high volume of bookings or events on your calendar, it may take longer for them to generate on the calendar as the generator is pulling in a high volume of data.
- 2) That the booking exists in the future, but is not within the days in advance to book window. These bookings are placeholders to show where bookings will be generated.
- 1) You have just created the event and the bookings generator has not run yet.
-
-
-
-
-
-
- Example: If you have a belay class that happens every weekday and the schedule extends forever, but you restrict your customers from being able to register more than 30 days in advance, it means that every booking you see on the calendar 31 days from now will not have been generated/created yet. These bookings will automatically be created per the rolling booking rules you set on the event. You will see the complete event schedule in grey on your calendar in the Main App, but customers will not be able to view them on the Portal until those bookings have been generated.
-
-
-
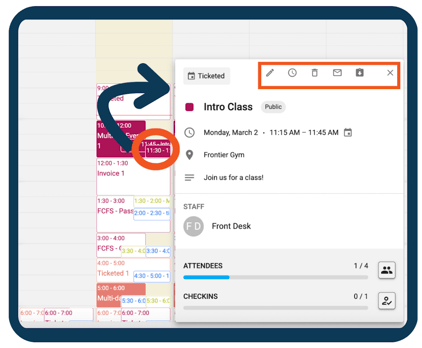
Once the booking is selected, this will be the view:

- Billing Type will show Invoice, Ticketed, Multi-day ticketed, or First Come First Serve
- Public or Private will describe the Customer Portal Access
- Staff profile(s) that are associated with the event
- Attendees will include a progress bar, capacity count, and link to the Guest list once the booking has >1 Guest.
- Checkins include a progress bar, check-in count, and link to the Check-in list once the booking has >1 Guest.
View, Edit, And Delete Bookings

- If you wish to view details about a booking or its related event, click on the booking you are interested in.
- After clicking, a pop up appears containing the Name, the Date/Time, location info and description (if it has one) related to this booking. It also contains a number of icons:
- To go to the booking, click the Pencil ✏️. This will take you to the particular occurrence within the Event, where you can manage the guest list and add any pertinent notes.
- To go to the event, click the Clock ⏲️. This will take you to the Event series for edits and event management. This is where you can manage the entrance requirements, categories, reschedule, etc.
- To email all current attendees in the event, click the
 email icon.
 - To download a csv of the attendees for the event, click the
 icon.
icon.
-
- To delete the booking (not the event), click the Trashcan 🗑️. If you want to remove the entire event (i.e. all bookings) from the calendar, you will need to go to the event and hit the "Remove from Calendar" button.
-
-
Current functionality for the options when selecting "Remove from Calendar":
-png.png?width=300&height=239&name=Square%2c%20Template%20(29)-png.png)
-
“Keep bookings” option: all generated bookings will remain available for customers to book but no new/future bookings (that are greyed out) will generate. If you keep the bookings they will not appear on the calendar, only in the bookings tab.
-
“Cancel bookings” option: all existing (already generated) bookings AND future bookings (not yet generated) will be removed from the calendar.
-
-
Calendar Terminology
Event
Events are the foundation, which determine how bookings are created on the calendar, setting a booking's recurrence, general info, entrance requirements and categories.
- To see the Event information, you can click on the Clock ⏰. Or if you are on a specific booking, click on "View Event" tab.
Example:
You create a recurring Bouldering Class Event.
- Booking 1: 11:00 AM
- Booking 2: 1:00 PM
Both bookings belong to the same event.
Booking
A booking is where activity data is captured (guests, notes), unless you are using the multi-day ticketed billing type, which captures that activity on the event itself.
- This is a time slot on the calendar that customers, if they have the appropriate prerequisites, can sign up for.
- Bookings are displayed on the calendar. To go to the booking, click the Pencil ✏️.
Billing Types
Invoice
- The Invoice billing type includes bookings where a single Organizer pays for the booking slot.
- Common examples of these would be birthday parties and group events with one host/buyer.
Ticketed
- Where each Guest purchases a ticket for a single day booking.
- Common examples could be personal training & belay classes.
Multi-Day Ticketed
- Where each Guest is populated in all the bookings within the event that can occur over multiple days, weeks, months, etc.
- Common examples would be summer camps and multi-day training courses.
First Come, First Serve (FCFS)
- Where you can define the different entrance requirement(s) a customer needs in order to make a reservation to a single booking.
- The different entrance requirements you can use are a combination of predefined passes and memberships OR a group.
- You can only use one as an entrance requirement, not a combination of groups and passes/memberships.
- When you use a group as an entrance requirement, each future booking for that event has its guest list populated with the members of the group chosen.
- Common examples would be a Yoga Class exclusively for members.
See this article for some Event Examples to help you get started!
Calendar Admin Tab Terminology
Organizer
- The organizer is the person that pays for an invoice booking. This person does not have to be a member of the gym, but does have to have a profile within approach in order to book.
Pricing Tiers
- A pricing tier is used to designate pricing to an invoiced event. It is selected by the organizer for a group of people. These are listed as pricing options for groups or parties.
- This can be a flat rate, or price per head (which will require checking Guests in, to have the correct Balance).
- For example, a birthday parties can have multiple different pricing tier options. These could be silver, gold and platinum.
- Every invoiced event must have at least one pricing tier.
- Here's an article about setting up Pricing Tiers
Deposit and Balance Due
- The deposit is the amount the organizer pays to secure the booking and it applies towards the total cost of the booking.
- The balance due is what the organizer owes after paying the deposit. This depends on the pricing tier the organizer has purchased.
.png?width=670&height=503&name=Modern%20Pastel%20Flowchart%20(1).png)