---
title: Forms Overview
description: In this guide, you will learn how to create a form, add it to events, email to customers, and export forms.
---
[Skip to content](https://support.approach.app/knowledge-base/forms-overview#main-content)
English
Show submenu for translations
[](https://support.approach.app/knowledge-base?hsLang=en)
- Home
- Products
- Pricing
- Blog
- Company
Open main navigation
Close main navigation
- Home
- Products
- Pricing
- Blog
- Company
- English
Show submenu for translations
- [Contact us](https://share.hsforms.com/1-n8QjFL3Rfiu-MkWDeoqcwnvfva)
[Contact us](https://share.hsforms.com/1-n8QjFL3Rfiu-MkWDeoqcwnvfva)
Welcome to Approach!
- There are no suggestions because the search field is empty.
1. [Approach Knowledge Base](https://support.approach.app/knowledge-base?hsLang=en)
2. [Approach Main App](https://support.approach.app/knowledge-base/approach-main-app?hsLang=en)
3. [Forms](https://support.approach.app/knowledge-base/approach-main-app?hsLang=en#forms)
# Forms Overview
## In this guide, you will learn how to create a form, add it to events, email to customers, and export forms.
### Table of Contents
- #### [**Forms Admin**](https://support.approach.app/knowledge-base/forms-overview#Admin)
- #### [**Questions**](https://support.approach.app/knowledge-base/forms-overview#Questions)
- #### [**Templates**](https://support.approach.app/knowledge-base/forms-overview#Templates)
- #### **[Submissions](https://support.approach.app/knowledge-base/forms-overview#Submissions)**
---
### **Forms Admin**
There are three aspects of the Admin-side of Forms in the Main App: Questions, Templates and Submissions.
#### **-png.png?width=688&height=390&name=Group%202%20(1)-png.png)**
- #### Questions
The Questions tab permits business owners and staff to create questions that can be used across different form templates. Any questions created here will be available for use when you create a form template.
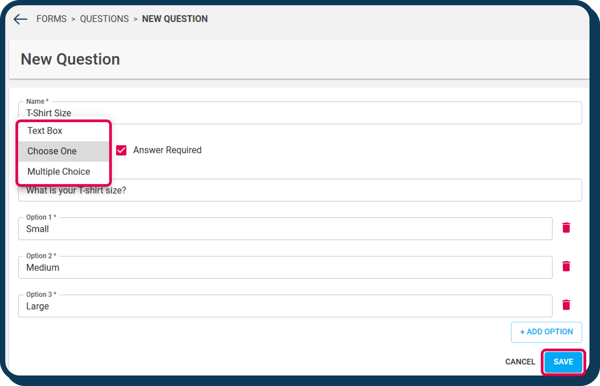
1. Name: staff-facing and used in the header of the submissions list in the main app to organize the different questions together.
2. Text Box: permits a customer to reply with text to a question set by manager/staff (ex: comment box, suggestion box, allergies, accommodations)
3. Choose one: permits a customer to reply with one choice (ex: t-shirt size; food option for event)
4. Multiple Choice: permits a customer to reply by choosing multiple options (ex: birthday party add-ons)
Each question you can choose to set as "Answer Required," requiring the customer to fill out the question to successfully complete the form.
- #### Templates
1\. To create a Form Template (the meat and bones of the form), select the "Templates" tab and "Add Form Template". Fill out the following fields:
- Name: staff facing, used to name the form for staff
- Description: staff facing, used to describe the form for staff
- Form Title: customer facing, will appear on the form sent to customers by email
- Form Instructions: customer facing instructions, will appear under the "Form Title" on the form sent to customers by email
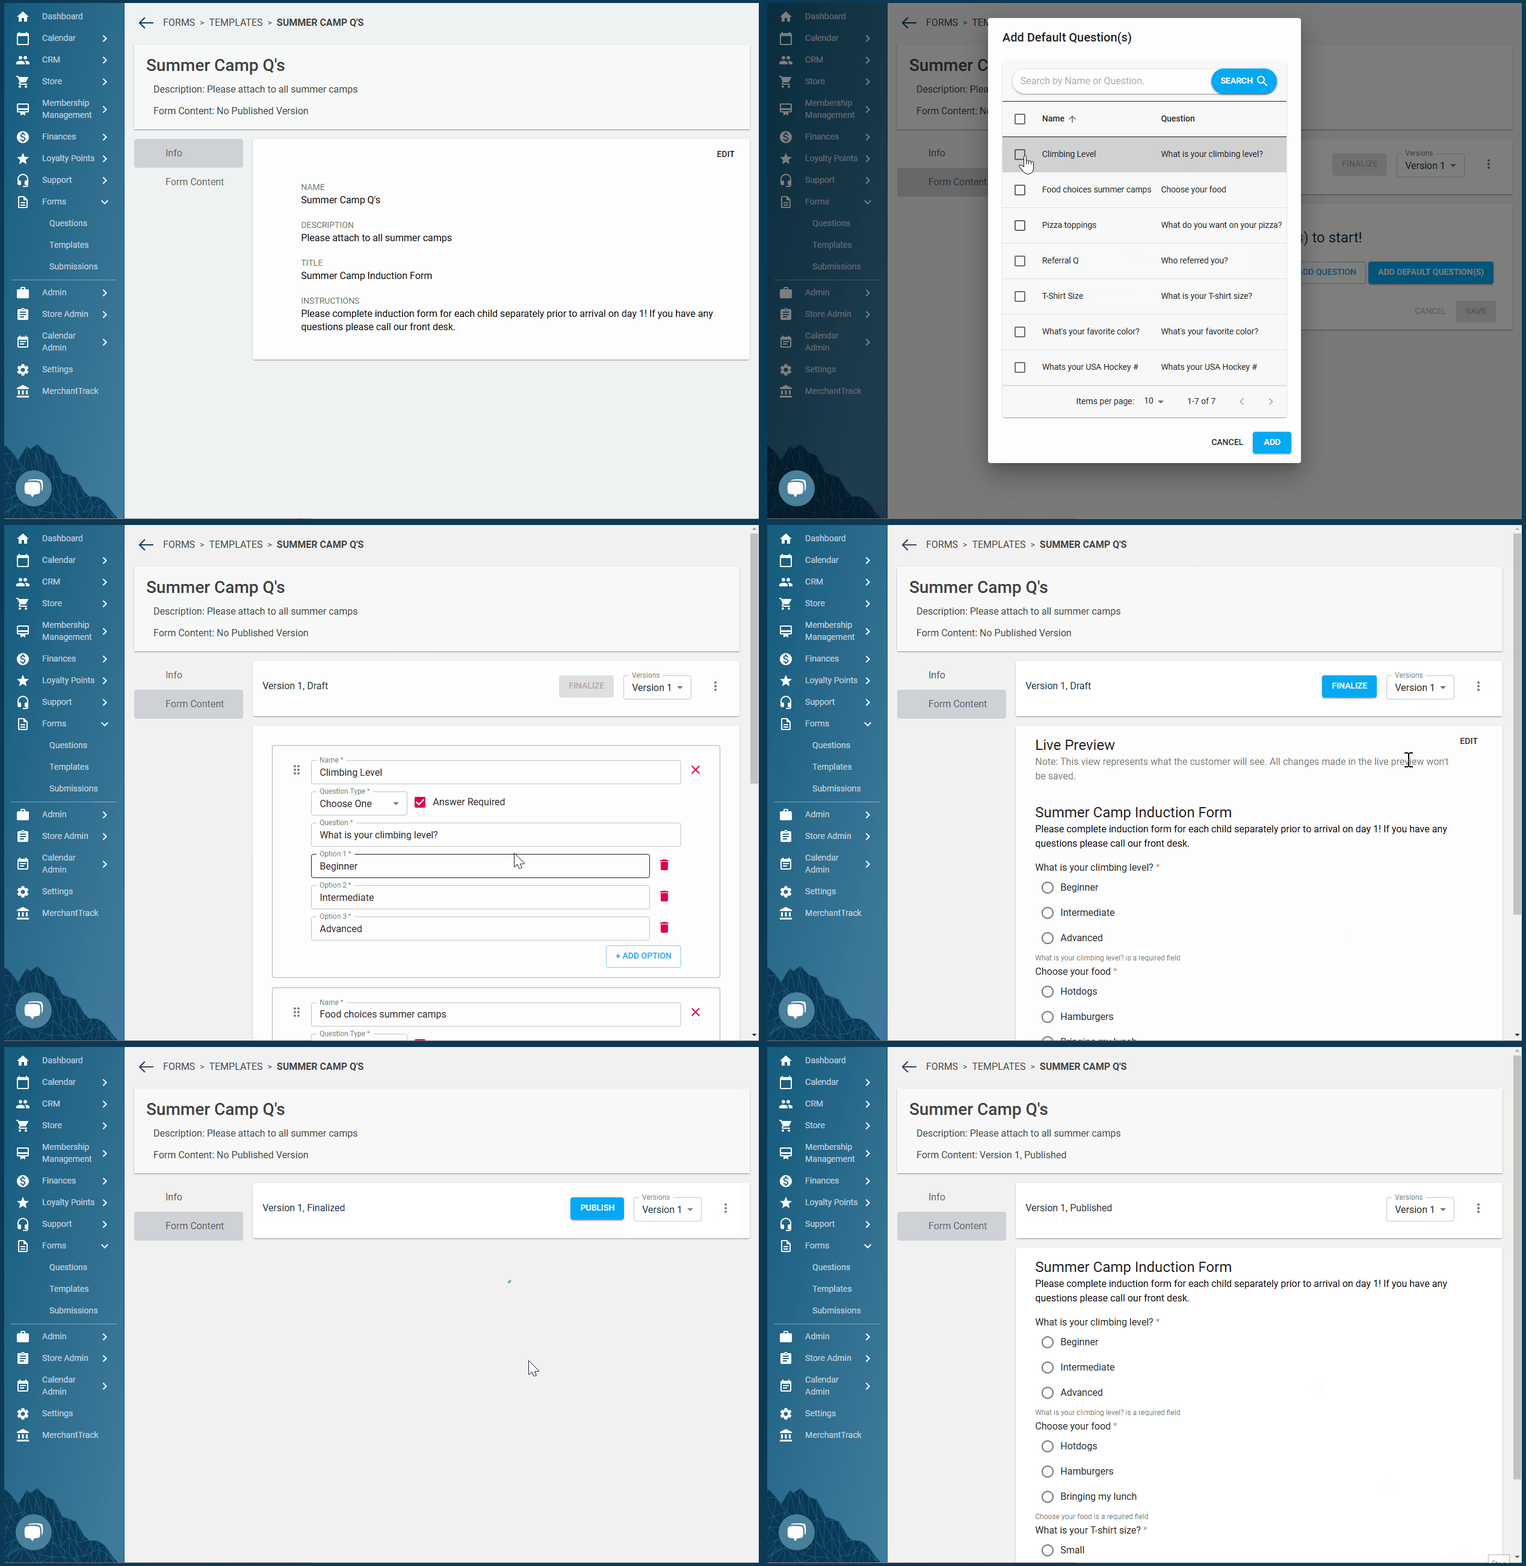
2\. After clicking "Save," you will be brought to the following screen, where you can prepare your form's questions with the "Form Content" tab.
3\. The top header shows what *version* of form content you are viewing and what *state* that version is in (draft, finalized or published):
- **Draft Mode:** you can add questions two ways: 1) "Add Question" permits you to make questions from scratch and 2) "Add Default Question(s)" allows you to select multiple previously created questions.
- After adding your questions, click "Save". You will see a live preview that you can edit, rearrange the ordering of the questions, etc.
- **Finalize:** When pressing the finalize button, this version's questions cannot change. This state locks in the content of the form. Before choosing to finalize a version, there is a dialog to confirm that you want to move the version from draft to finalize.
- **Published:** After pressing the publish button, this version is now the active form on this template, meaning any event that has this form attached to it will now use this newly published version. If there was another version that was published, that version will
- You can only add *published* forms to events.
- Old versions can be re-published (and used again) but only one version per template can be published at a time.
- You will be able to see previously published form versions that customers have filled out on associated bookings and also on the submissions tab.
- #### Submissions
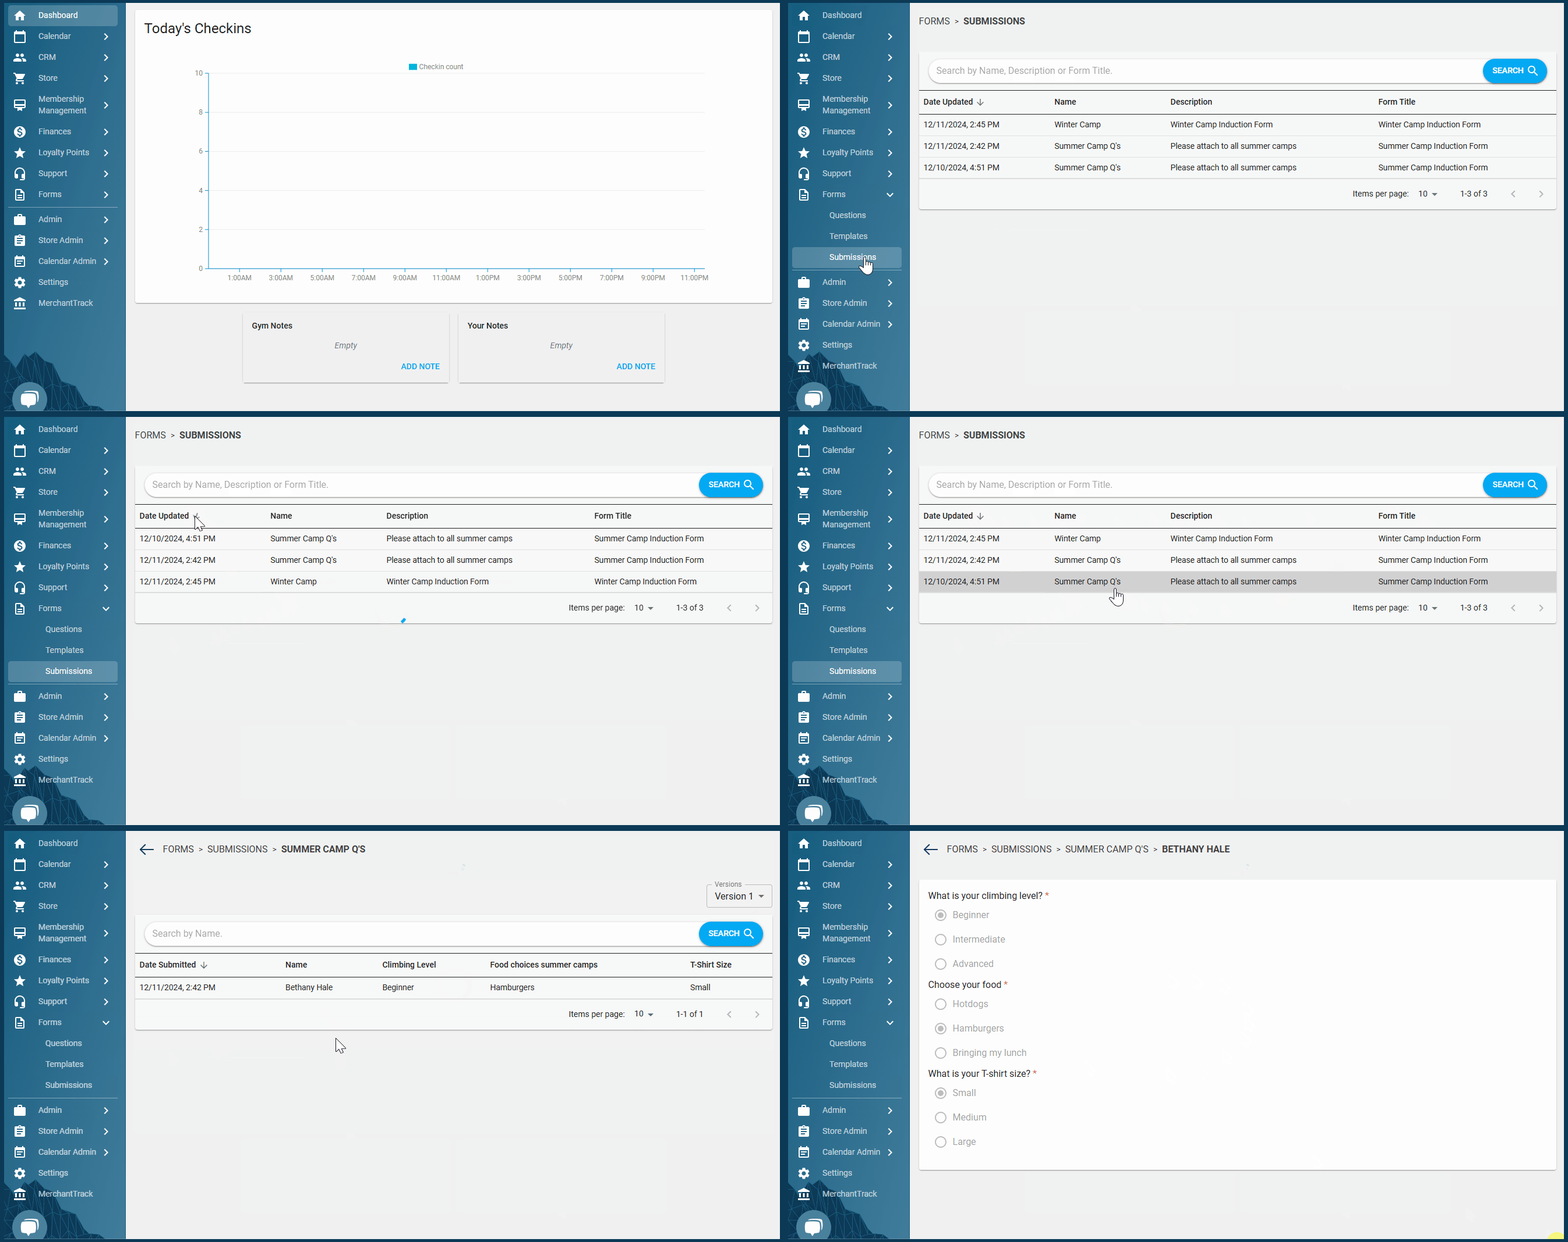
The submissions page shows all the submissions, organized by template, customer submission, etc. (filtered by version and searchable by name).
---
#### Adding Forms to Events
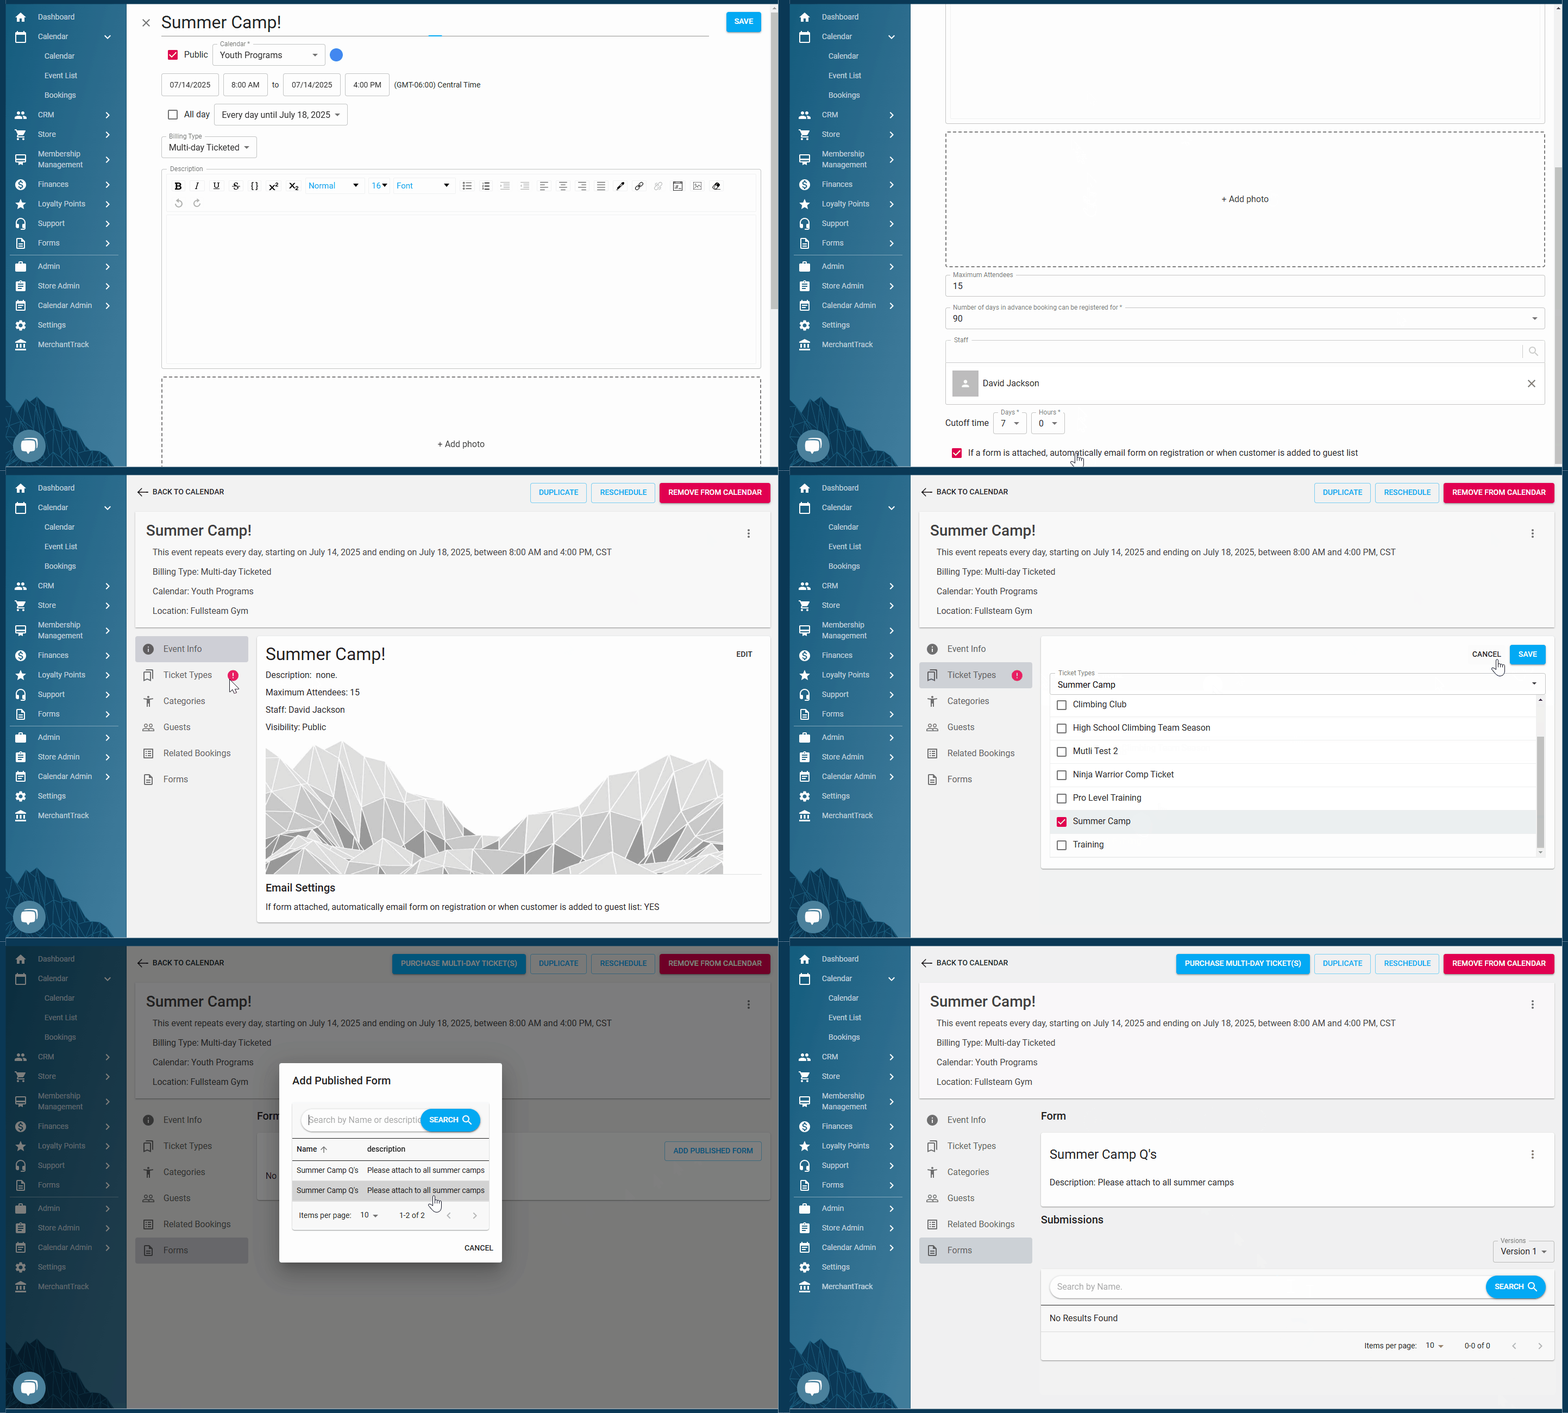
You can add forms to each event type (on multi-day ticketed events, the submissions will appear on the event; on all other event types, the submissions will appear on the bookings).
When creating an event, there is a setting that you can select which reads, "If a form is attached, automatically email form on registration when customer is added to guest list."
If you have a previously created event that does not have a form attached but you wish to add a form to send to guests, please make sure to edit the event's setting on the Event screen.
---
#### Customer Submission
Customer's who register for a class will then receive the Form in their email inbox to fill out:
-png.png?width=500&height=312&name=image%20(19)-png.png)
Managers & staff can easily see if a guest has filled out the form or not on the guest page and are able to re-email the form links to those who have yet to submit.
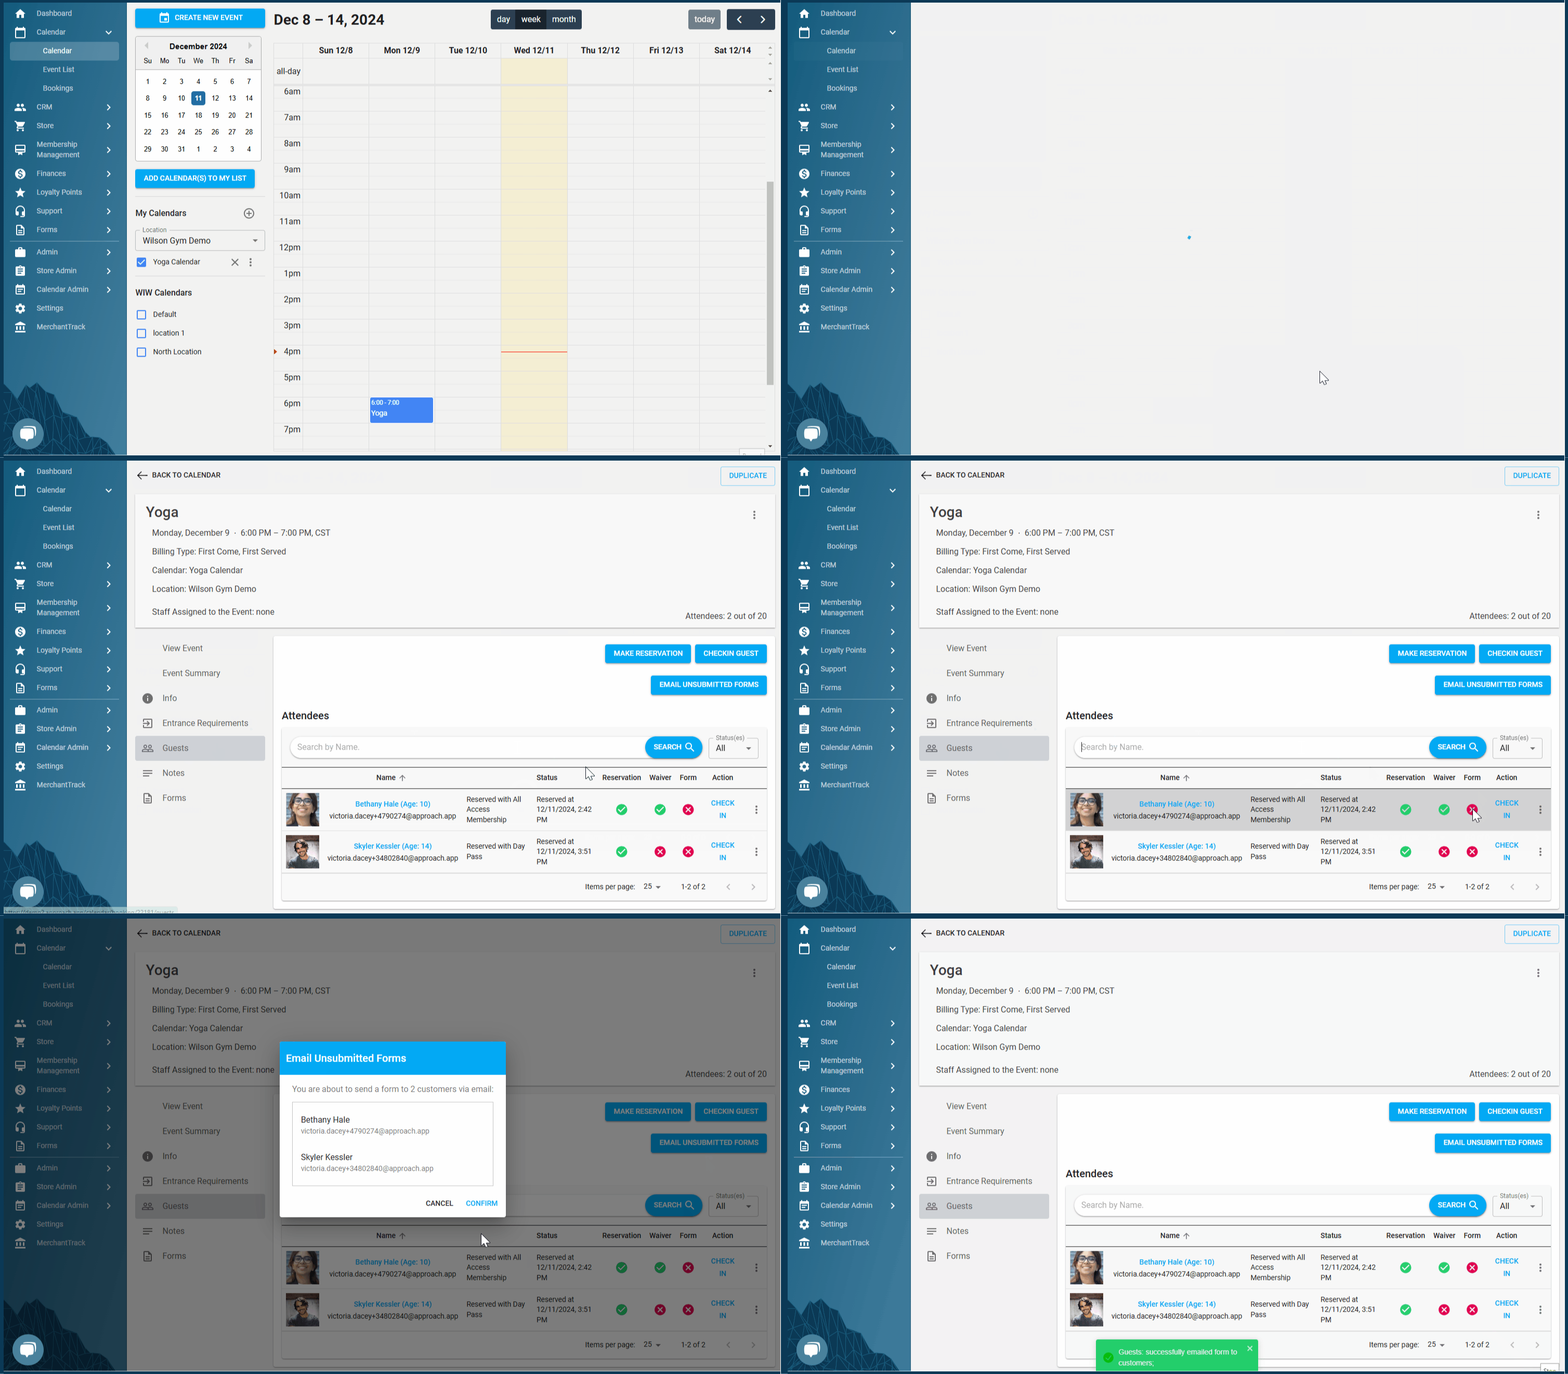
To look at the submission from those forms, simply go to the forms tab. You can look at submission records individually by clicking on them. 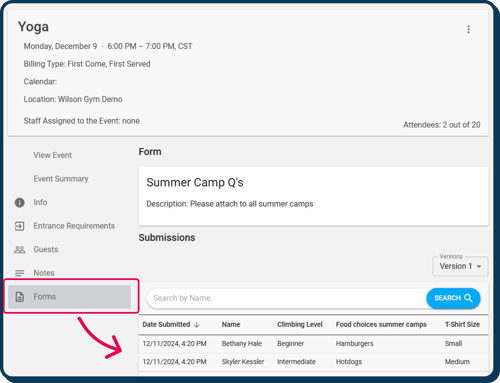
---
### How to Export Forms
To export a form, simply go to the event (booking if it is not multi-day ticketed) whose form you want to export, then click the hamburger button. From there you can choose to email attendees, download CSV attendee list, or download the csv attendees list with the forms information.
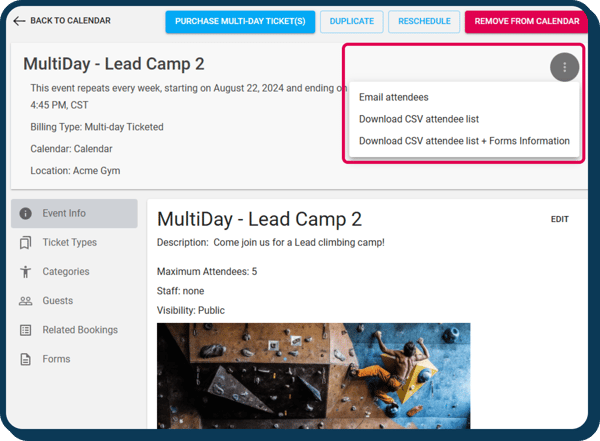
**Important Notes regarding form exports:**
- If a form is published, the CSV will include both attendee and form response data. Otherwise, an error will prompt you to publish a form
- Form Versioning: Only data from the currently published form version is included.
- Reservation Date: Is available only for invoiced bookings.
- Multi-Day Events: The hamburger button is located on the event page, not individual bookings.
---
If you have more questions about Forms, do not hesitate to reach out to [CXM@approach.app](mailto:cxm@approach.app) or submit a questions form in the main app.
- [Setting Up Approach](https://support.approach.app/knowledge-base/setting-up-approach?hsLang=en)
- [Approach Main App](https://support.approach.app/knowledge-base/approach-main-app?hsLang=en#main-content)
- [Calendar](https://support.approach.app/knowledge-base/approach-main-app?hsLang=en#calendar)
- [CRM](https://support.approach.app/knowledge-base/approach-main-app?hsLang=en#crm)
- [Store](https://support.approach.app/knowledge-base/approach-main-app?hsLang=en#store)
- [Forms](https://support.approach.app/knowledge-base/approach-main-app?hsLang=en#forms)
- [Admin](https://support.approach.app/knowledge-base/approach-main-app?hsLang=en#admin)
- [Store Admin](https://support.approach.app/knowledge-base/approach-main-app?hsLang=en#store-admin)
- [Settings](https://support.approach.app/knowledge-base/approach-main-app?hsLang=en#settings)
- [Portal](https://support.approach.app/knowledge-base/approach-main-app?hsLang=en#portal)
- [Kiosk](https://support.approach.app/knowledge-base/kiosk?hsLang=en#main-content)
- [Kiosk](https://support.approach.app/knowledge-base/kiosk?hsLang=en#kiosk)
- [Customer Portal](https://support.approach.app/knowledge-base/customer-portal?hsLang=en)
- [Announcements & Release Notes](https://support.approach.app/knowledge-base/announcements-release-notes?hsLang=en#main-content)
- [Release Notes 2025](https://support.approach.app/knowledge-base/announcements-release-notes?hsLang=en#release-notes-2025)
- [Release Notes 2024](https://support.approach.app/knowledge-base/announcements-release-notes?hsLang=en#release-notes-2024)
- [Supplemental Information](https://support.approach.app/knowledge-base/supplemental-information?hsLang=en#main-content)
- [Integrations](https://support.approach.app/knowledge-base/supplemental-information?hsLang=en#integrations)
- [Set Up Assistance](https://support.approach.app/knowledge-base/supplemental-information?hsLang=en#set-up-assistance)
- [FAQs](https://support.approach.app/knowledge-base/supplemental-information?hsLang=en#faqs)
- [Quicksight Dashboard](https://support.approach.app/knowledge-base/quicksight-dashboard?hsLang=en)
- [Approach Journeys](https://support.approach.app/knowledge-base/approach-journeys?hsLang=en)
- [Onboarding](https://support.approach.app/knowledge-base/onboarding?hsLang=en)
[](https://support.approach.app/?hsLang=en)
Copyright © 2025, Approach