Skip to content
English
  • There are no suggestions because the search field is empty.

How to Check In & use QR/Barcodes

In this guide, we will cover how to use QR codes and Barcodes for checking into the gym. There is also a video that covers how to check in.

Table of Contents:

QR Code

Comprehensive Video on How to Check In

QR codes

First, you will need to manually send the customer their QR code to save to their phone.
 
First click CRM, then Customers, then open the profile of the customer.
 
Then click the Hamburger, then Send QR Code.
Screen Shot 2021-08-24 at 2.22.17 PM.png
This will send them an email with their QR code.
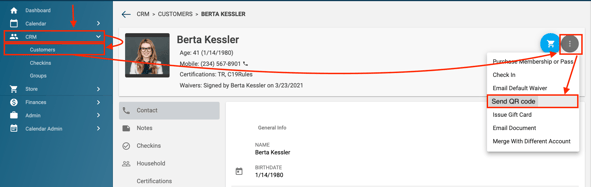
  • Apple users can save this to their Apple Wallet
  • Android users can save this as an image.
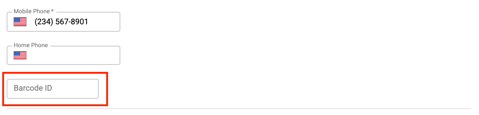
Your customers will be able to check-in by scanning their QR codes.  It will automatically put their check-in to the pending check-in status bar on the MainApp for your approval.
 
Note: PKPasses are not supported by android devices but they are functional on iOS devices. Android users can:
     1) Download the Portal as a PWA to access their QR codes. To learn how to download            the Portal as a PWA click HERE.
     2) Download the YourWallet app which will allow you to download and store digital              passes in the pkpass format.
     3) Save the QR code image from the email for check in. 
 

Barcodes

There are two instances to use barcodes for your customers to checkin.
  • Coming from a legacy CRM system to Approach
  • Using custom-made key fobs with the customer’s profile ID printed on them
 
On every customer profile, there is a field that can be edited named Barcode ID.
 
If you are coming from a legacy system where these numbers already exist, upon completion of a successful data import, each customer’s Barcode ID will display here.
 
If you choose to use printed key fobs with barcodes on them and wish to issue one to a customer, you will need to edit the person’s profile and scan in their new barcode upon issuance.
Screen Shot 2021-08-24 at 2.32.01 PM.png

How to Check in with QR Codes and Barcodes

For checking customers in with a QR code or a barcode, we recommend having a dedicated computer and monitor, or a dedicated laptop, that is connected to your scanner. On that monitor, you should have two windows open that are tiled to the right and left side of the screen: the Kiosk, set to barcode mode, and the Main App with the notifications tab open. Refer to the photo below to see how we suggest you set this up:
Barcode Checkin-1

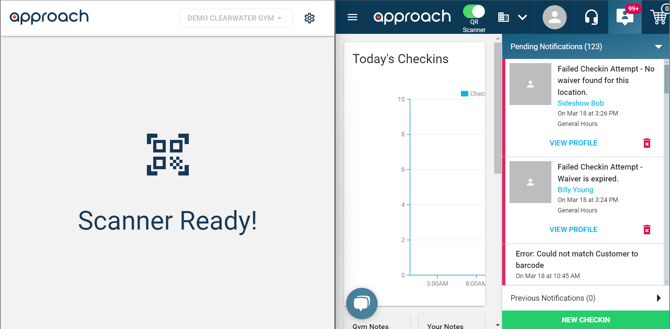
For this to work properly, the window with the Kiosk must be selected with your cursor so the scanner sends the barcode or QR code information to the Kiosk screen. To avoid creating issues with customers checking in during peak hours, we also recommend setting the barcode reader timeout to either 1 or 2 seconds. The Main App window is exclusively being used to monitor those check-ins for any issues, which will be sorted to the pending notifications tab and can be dealt with by an employee on their primary workstation. If a staff member attempts to deal with an issue by selecting the account on this screen, it will deselect the Kiosk window and the scanner will no longer be sending their barcode or QR code information to the Kiosk to check in.


Now you can have customers check in with a barcode or QR code and monitor their check-in status efficiently!

Note: If you request that Approach enable auto-approval for checkins, both barcode and QR code checkins will be auto approved (to general hours only). 


How To Check In Comprehensive Video

If you still have questions on Check Ins, QR codes or Barcodes, email us at CXM@approach.app or fill out the questions form in the main app support chat bot.