Table of Contents
Use Variant Types on Other Products
How to Edit Product by Location
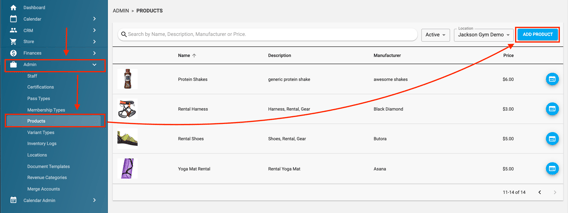
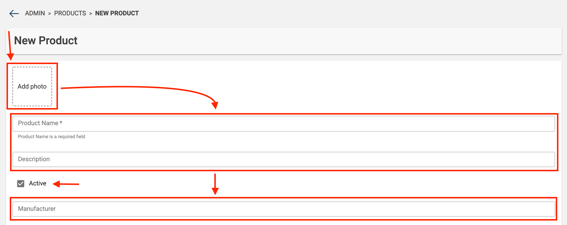
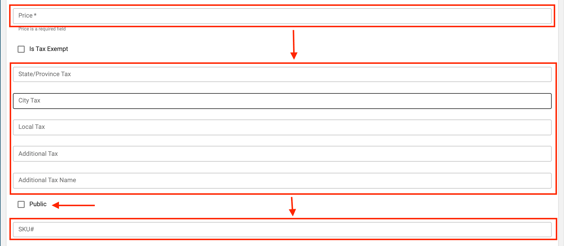
Create New Product
Creating Variant Types
Note: without creating variant types, you will not be able to add inventory to your products.
.png?width=670&height=373&name=Screenshot%202024-06-07%20at%201.50.01%20PM%20(1).png)

 Then click Variant Options and then click Add Variant Option.
 You have now completed making a Variant Type with Variant Type Options.
Add & Modify Variant Types


To convert a Product Variant into a Global Variant so that it can be used with other products, find that Variant Type in the Store Admin section of the Main App and press "Convert Into Global Variant". See below:


What happens if I change my mind and want to use the new variant on other products?
You can upgrade them to a global variant and use them everywhere.
To do this navigate to Store Admin>Variant Types and click "convert to global variant"

How to Edit Product by Location
First click the hamburger button and select "Enable product by Locations & Variants"
Then click "Product Management" followed by the big blue button, "Modify Product Variants & Locations".
.gif?width=670&height=365&name=Untitled%20(11%20x%206%20in).gif) You can now choose which locations you want this product to be available at. Click "Save & Next" when done selecting locations.
You can now choose which locations you want this product to be available at. Click "Save & Next" when done selecting locations.
Global Vs Product Variants
What is the difference between the two? Global Variants are variants that can be used on all products. Usually this is something general or broad. Ex: Sizes, Color, etc..
Product Variants are more brand specific variations. Ex: Flavor, Product Types. etc.
You can now manage your variants. You can choose "Add Existing Global Variant" or "Create Product Variant"

What if I want to remove a variant type & replace it with a new type or add a location?
No problem. Simply click "Modify Product Variants & Locations." This will take you to the variants setup screen and keep your initial variant and location settings.
Existing options will show whether the variants are currently Active or Inactive for each location. If a product variant is Active, it will appear switched on. If it is Inactive, it will appear switched off.
To see your previous variants and locations attached to the product, utilize the Status filter options: Active, Inactive, All.
In the review step, you’ll see a negative icon if something was made Inactive or if a new location/product variant is Inactive. A neutral icon will appear if nothing changed. A positive icon will appear if something was turned on or if a new location or product option is on.
How to Add Inventory


Re-Order Point is relevant to Quicksight. You can filter on Quicksight items that need to be reordered.
Example: I want to reorder chocolate chip Clif bars when I get down to 12 bars. You can set your reorder point to 12. When it is time to do your ordering, you can search your reorder points through a Quicksight report. If you set a reorder point for all of you products, this makes ordering a breeze!
Do you still have more questions? We want to make our knowledge base as accurate and as in depth as possible. If you think this article is missing anything, please let us know here. We will update the article and let you know we have done so!