Promo Code Creation
Using Promo Codes
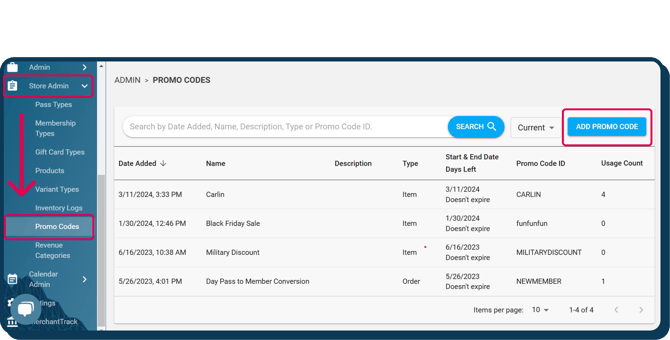
How to Set Up a Promo Code
To create a promo code, please expand the Admin section on the left sidebar and select the tab called "Promo Codes". Next, select "Add Promo Code", as seen in the screenshot below:
Next, fill out the needed fields as described below:
-
Name and Description
Fill out the Name and Description of the Promo Code in the first two fields of the pop up. Both of these fields are only staff-facing, so please feel free to name and describe your promo code in a way that works best for your facility.
-
Setting Start & End Date Times
Next, select the Start Date + time and the End Date + time of your promo code. If you choose a future date/time other than today, your promo code will be considered invalid until that date/time is either current or in the past.
Please Note: You can go in and update the start and end date at any point to reactive an expired promo code.
-png.png?width=346&height=377&name=Promocodes%202%20(1)-png.png)
-
Promo Code Types: Item vs Order
Next you will select between "Item" based promo codes or "Order" based promo codes.
Item-type promo codes are created solely to apply to specific items within your memberships, passes, products, tickets, and pricing tiers. This type of promo code can only be % based. If you select this type, be sure to read through Selecting Applicable Items For Item Based Promo Codes****
Order-type promo codes are for discounting the entire cart during check out, they are not restricted by items. These can be either % based or flat rate.
- If using percentage, you will add the amount that you want it to discount the cart.

- If using flat rate, you will have to specify both the discount value (how much it will subtract from the total) and the minimum purchase value (the lowest total that the promo code will be valid for).

NOTE: The Minimum Purchase field has to be equal to or more than the discounted amount to prevent negative totals.
-
Maximum Times a Promo Code can be Used
This controls how many orders a promo code can be applied to. If you leave this field blank, it means that the promo code can be used infinitely until it expires. If you add a number to this field, every time an order is completed with the promo code 1 use will be added to the use count (example: Usage Count 5 of 10)
Note: If an order that used that promo code was canceled, voided, or refunded, the usage count will be updated to remove that order from the overall count.
-
Maximum Times of use Per Customer
This is how many times a specific customer can purchase an order using that promo code. If you set this number to 1, customers can only use this promo code on one order and then they will not be able to apply it to any subsequent orders.
Note: If you add a number to this field, the promo code will not be usable on any guest orders as our system has no way of knowing if the same "guest" has used the promo code before.
As of July 2nd, 2025, Promo Codes can be used for guest checkout!
-
Promo Code
Last but not least, select a unique promo code that customers and staff will use when applying the promo code to their orders.
Examples of unique holiday promo codes could be "HOHOHO" or "SANTASALE2022".
To keep the historical data intact, we recommend creating a new promo code instead of updating a previously used promo code. Along with this, when creating promo codes we recommend adding the year to the promo code id while keeping the rest of the promo code id the same as the previous year. (Example: "HOLIDAY2022, HOLIDAY2023, HOLIDAY2024....etc.)

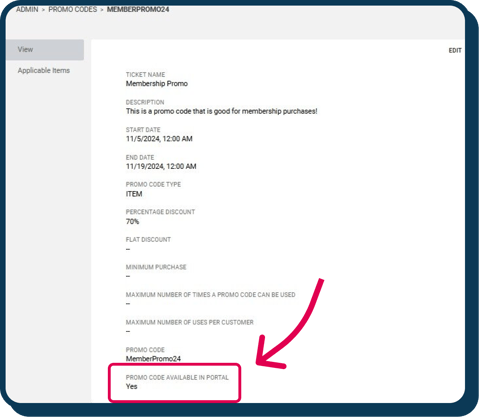
- Setting up Promo Codes available "In Stores" Only:
When creating a promo code (or edit an existing promo code), you will see a setting called: “Promo Code Available in Portal”.- If you check the box, customers will be able to use this promo code when checking out qualifying purchases in the portal.
- If you uncheck the box then that promo code will NOT be applicable for online/portal purchases. However, it will still be usable for purchases made in stores via the Main App.
Setting Applicable Items to Item Type Promo Codes
After creating your Item type promo code, you will see a section beneath it called Applicable Items. This is where you will assign which Items you want the promo code to be valid for.
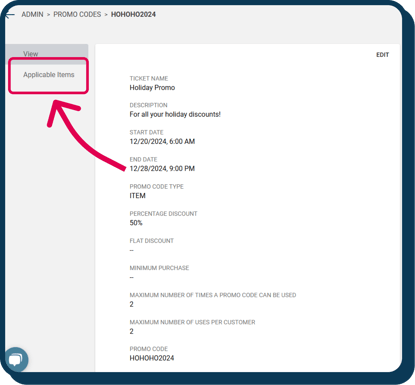
After going to this section you will see a button called "Link Items":
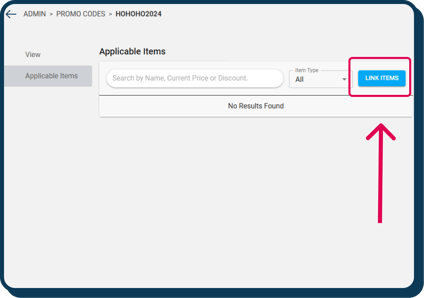
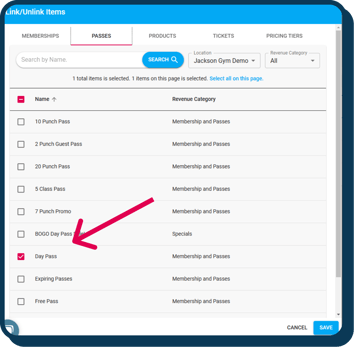
Clicking Link Items will cause a pop-up to open allowing you to select multiple items from 5 different categories: Memberships, Shared Memberships, Passes, Products, Tickets, and Pricing Tiers. After selecting all the items that you want to promo code to be valid for, click Save to move on to the next step:
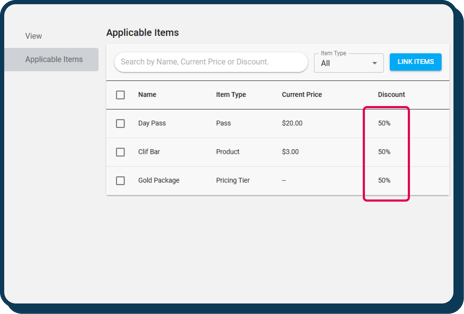
After saving all the items you select will be displayed on a list and they will automatically be set to whatever percent discount the promo code had assigned to it:
If you want to update this list by either removing items or updating the discount percent for specific items, please select the items that you want to update by clicking on the checkboxes next to the item's name. This will cause a hamburger menu to appear on the right-hand side that will give you the following options: Remove Items or Update Discounts.
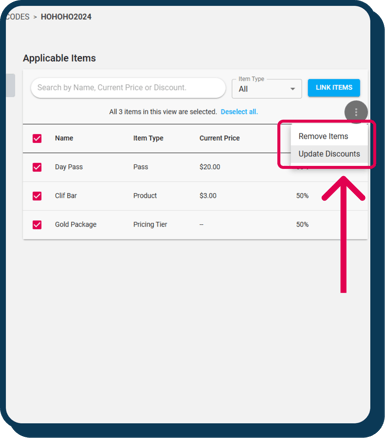
Note: Items can always be re-added if they were removed by mistake.
If you select Update Discount, a pop-up with open with a field where you can add the amount you want to update the discount percentage to. Upon hitting Save, the items that you had selected will now have the updated discount value.
Adding Promo Codes for Revenue Categories
In early spring 2025, we introduced a feature allowing promo codes to apply to entire revenue categories. This means you no longer need to update promo codes manually as new items are added. For example, if you want a promo code for all clothing for members, it will automatically include any new clothing items added to that category. The example below demonstrates a promo code for all Black Diamond items at 50% off for a week—simply select the Black Diamond revenue category when assigning items to the code.
To create a promo code for a revenue category, simply create your item based promo code type as with any other item based promo code. Once the code is created, within the promo code click "Applicable Items" followed by "Link Items".
.png?width=670&height=422&name=Frame%206%20(1).png)
In the final step of creating these promo codes, you will be asked wether to apply this promo code to the sign up fee and how to apply to membership dues. This prompt will appear whether or not your promo code is currently related to memberships. This is a way to future proof the code, should you add a membership to that revenue category in the future. See pic below.
.png?width=670&height=189&name=Wide%2c%20Template%20(9).png)
Important Notice:
-
There is a scenario in which a single asset (example: Climbing Crew Membership) has both an item based discount and a revenue category based discount - when this occurs, if there is difference in the % amount of the discount the greatest discount amount will be used along with the membership settings tied with this discount.
-
Example:
-
I set up the Promo Code Flash Sale
-
I select the Climbers Association revenue category type with a 50% discount and it is only good for the initial purchase
-
I then select the All Access Membership with a 25% discount and it is good for both the initial purchase and the recurring dues
-
However the All Access Membership has the Climbers Association revenue category associated with it
-
This means that the All Access Membership is valid for both the 50% discount do to the rev cat and the 25% discount due to the membership type.
-
If a customer goes to purchase this membership and they add the promo code to the cart the following will happen:
-
The membership will receive a 50% discount
-
BUT it will only be on the initial purchase and they will NOT have the 50% saved for recurring billing
-
-
-
If the discounts in the example above were equal (both 50%), then the item (membership type) discount + its memberships setting would be used
-
So the membership would get a 50% discount on the initial order AND the recurring billing because that is what the item/membership based promo code was set up.
-
Can promo codes by revnue category be set for specific locations?
No promo codes by revenue category cannot be used for specific locations. There is a filter for locations on the link item dialog box, however this is there to help you locate revenue categories easier. The image below shows the referred location filter.
.png?width=670&height=183&name=Wide%2c%20Template%20(10).png)
Setting up New Item Based Promo Codes for Memberships
When setting up your Item level promo codes, there are settings that can be set when linking memberships. Please see the video below for our step by step guide.
Note: These settings are ONLY available for ITEM based promo codes, not Order based promo codes.
Go to "Store Admin" and select the "Promo Codes" tab
- Click "Create New Promo Code"
- Select "Item" for the Promo Code Type
- Fill out all the other required fields and "Save"
- Select the tab labelled "Applicable Items"
- Now click "Link Items"
- Select the Memberships you want the promo code to be valid for (and any other assets you want the promo code to be valid for), then click Next
- You will now be able to set the new Membership promo code settings
- You will first have the option to “Apply to signup fee” this means that the promo code will apply a discount to the sign up fee when completing the initial purchase of that membership
- You will see additional settings called “Apply to membership dues”
- Under this setting you will see three options:
- Initial Sale & Recurring Dues: This means that the promo code will apply to both the initial purchase amount of the membership and the subsequent recurring billing price.
- Initial Sale: This means that the promo code will apply to JUST the initial purchase amount
- None: This means that the promo code will NOT apply to either the initial purchase amount nor the recurring billing price.
- Under this setting you will see three options:
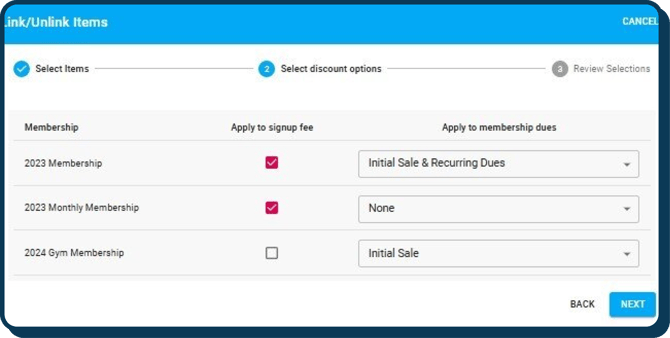
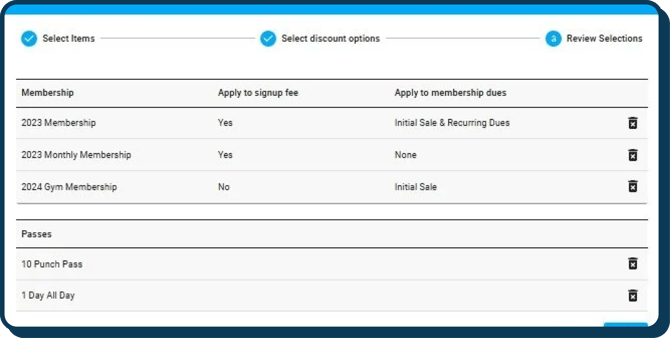
- In the example above:
- You can see that "2023 Membership" will be discounted for both the Sign Up fee and the Initial Sale + all recurring dues.
- The "2023 Monthly Membership" will only have its Sign Up fee discounted on purchase.
- And the "2024 Gym Membership" will only have a discount on the Initial Membership price but the Sign Up fee will be full price.
- After selecting the desired settings, click "Next".
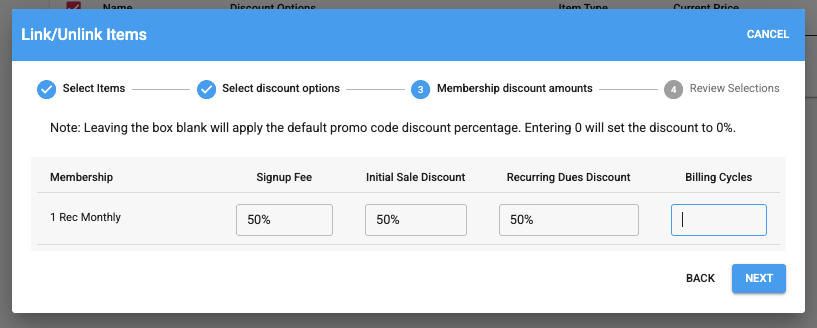
- On the next screen, you will be able to adjust the discount for the Sign Up Fee, Initial Sale, and/or Recurring dues. This way you have some flexibility if you'd like one or more of those fields to be different than the percentage set on the promo code! You'll also be able to select the number of billing cycles you'd like the discount to be applied to (or leave it empty if it's a permanent discount):
- Next, you'll see a review screen where you can review all the assets you have selected to be valid for the promo code. From here, you can remove assets or add more if you realized that something should not be on the list or is missing.
Editing Existing Itemized Promo Codes
- For updating existing promo codes, please navigate to your desired Promo Code ("Store Admin"-> "Promo Codes")
- Click "Applicable Items" then select "Link Items"
- Keep the initial selected membership or update if needed, then click "Next"
- You will now be able to set the new Membership promo code settings
- You will first have the option to “Apply to signup fee” this means that the promo code will apply a discount to the sign up fee when completing the initial purchase of that membership
- You will see additional settings called “Apply to membership dues”
- Under this setting you will see three options:
- Initial Sale & Recurring Dues: This means that the promo code will apply to both the initial purchase amount of the membership and the subsequent recurring billing price.
- Initial Sale: This means that the promo code will apply to JUST the initial purchase amount
- None: This means that the promo code will NOT apply to either the initial purchase amount nor the recurring billing price.
- Under this setting you will see three options:
- After selecting the desired settings, click "Next"
- On the next screen, you will be able to adjust the discount for the Sign Up Fee, Initial Sale, and/or Recurring dues. This way you have some flexibility if you'd like one or more of those fields to be different than the percentage set on the promo code! You'll also be able to select the number of billing cycles you'd like the discount to be applied to (or leave it empty if it's a permanent discount)
- You will now see a review screen where you can review all the assets you have selected to be valid for the promo code. From here you can remove assets or add more if you realized that something should not be on the list or is missing.
Note: If you have both “Apply to signup fee” and “Initial Sale”/”Initial Sale & Recurring Dues” selected then the discount % will apply to BOTH. Example: If discount percent is set to 10%, both the Sign up fee and the initial membership amount will be discounted by 10%.
Using Promo Codes in the Main App
After adding items to a customer's cart and moving to the Checkout screen, you will see a Promo Code discount option in the bottom right corner:
-png.png?width=670&height=338&name=Promocodes%2011%20(2)-png.png)
There are two ways to select which promo code you want to use:
- If you know the code, you can type the code in where it says "Enter promocode here".
- If you don't know what codes are available, you can click on the blue tag button to open up a searchable list of all available promo codes. After finding the code you want to use, you can click on it to apply it to the cart.
After adding the promo code to the cart, it will be displayed at the bottom under the "Total" field. The total discount will reflect how much the order has been discounted, and if the promo code is an item-level promo code, each individual item will display its discounted amount.
Note: Only one promo code can be added in the cart at a time.
Using Promo Codes Online via Customer Portal
When customers check out an order in the portal they will now be able to add a promo code if they have one as shown below:
-png-1.png?width=670&height=338&name=Promocodes%2012%20(2)-png-1.png)
After applying the code, the discount will be displayed as a discount to the whole order or a breakdown under each item if it is an item-based promo code. Just like the main app, customers will only be able to use 1 promo code per order.
Do you still have more questions? Drop us an email at cxm@approach.app. You can also submit your question through the Questions form in the main app.